Start a campaign email from a template, a blank page, your own HTML or a Quanta draft, then build it with blocks and send yourself a test.
6 min readUpdated 24 days ago
Before you start. Campaign emails go out through your own Resend account, so an Owner or Admin has to connect it first. Send from your own domain shows how. Owners, Admins and Members can write and edit drafts. Drafting with Quanta needs an AI provider or Rectify credits.
Start a new email
1.
In your project, open Customers, then Messaging.
2.
On the Campaigns tab, select New campaign.
3.
Select Email. The other two choices open Surveys and the widget's popup messages.
4.
In New email, enter a Campaign name. Only your team sees it.
5.
Write the Subject line and the Preview text, the line most inboxes show after the subject. In the inbox shows how they look together.
6.
Optional: change the From name. It's the name people see the email from.
7.
Select Continue.
8.
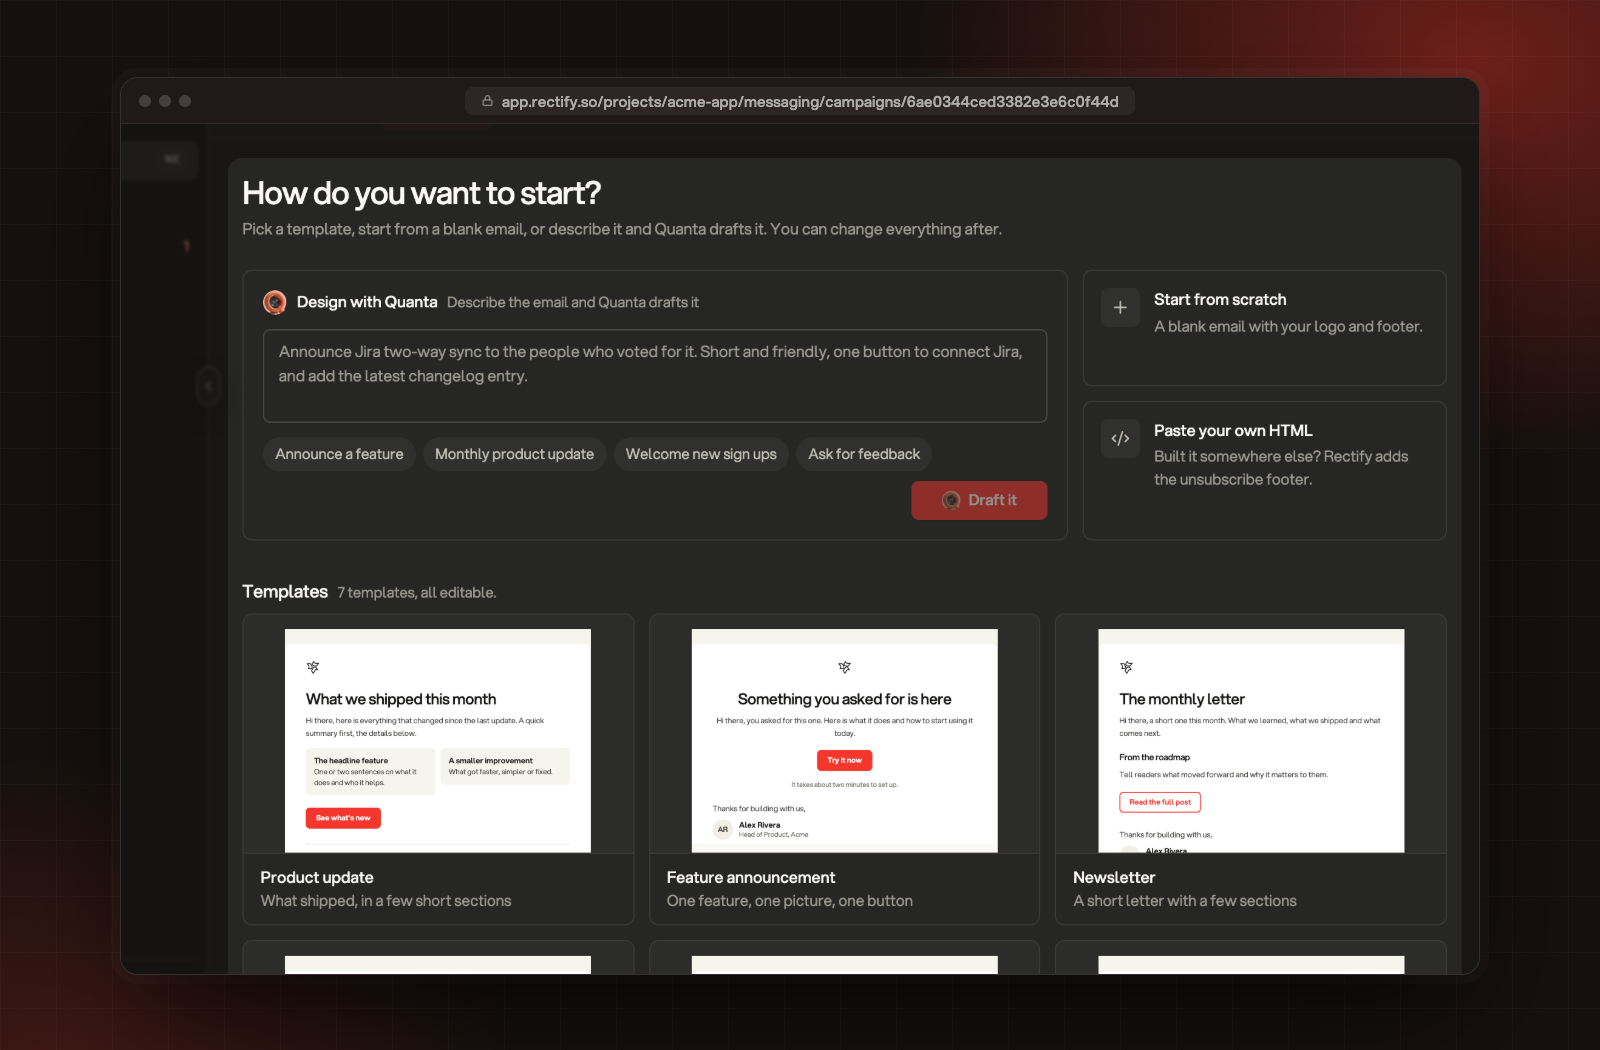
Choose how to start. You can change everything afterwards.
The ways to start an email: Design with Quanta, Start from scratch, Paste your own HTML and the templates.
Start with
What you get
Design with Quanta
Describe the email and select Draft it. Quanta writes it as blocks you can edit. The chips under the box, such as Monthly product update, fill in an example to start from.
Start from scratch
A blank email with your logo, a heading, a text block and your default signature.
Paste your own HTML
Your own HTML, cleaned for email. Scripts, forms and tracking pixels are removed, and Rectify adds the unsubscribe footer.
A template
Product update, Feature announcement, Newsletter, Welcome, Feedback request, Changelog digest or Personal note. Templates your team saved show first.
Build the email
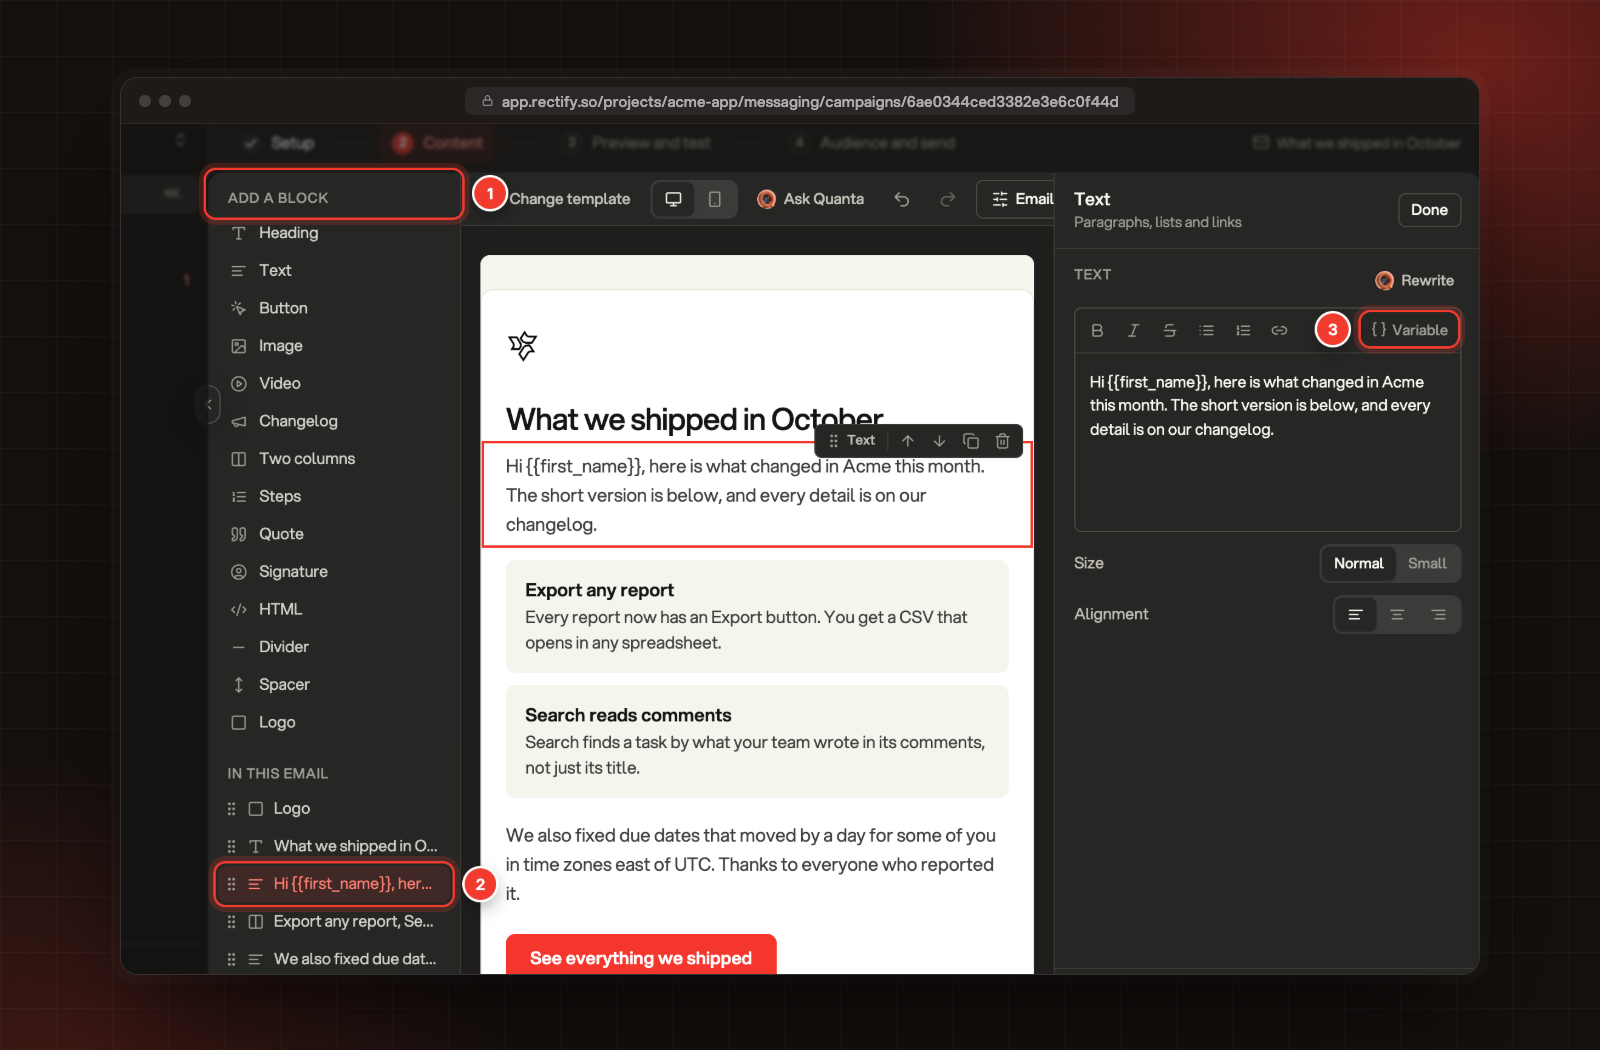
The builder has three parts: the blocks you can add on the left, the email in the middle and the settings of the selected block on the right.
1.
To add a block, select it under Add a block. It goes below the block you selected.
2.
To change a block, select it in the email or under In this email. Its settings open on the right.
3.
To greet people by name, select Variable in a Text block and pick First name. Rectify fills it in for each person.
4.
Select Save at the bottom, or press Cmd S.
1 Add a block. 2 The selected block. 3 Variable.
Point at a block in the email to move, copy or delete it. You can also drag it by its handle, or select it and press Alt and the up or down arrow. Undo and redo sit above the email, and Desktop and Phone show how it looks on each.
Block
What it's for
Heading
A short title
Text
Paragraphs, lists and links
Button
One clear next step
Image
A picture, with an optional link
Video
A preview that opens a YouTube, Vimeo or Loom video
Changelog
Entries from your published changelog
Two columns
Two short points side by side
Steps
A numbered how-to
Quote
Something a customer said
Signature
Who the email is from
HTML
Your own HTML, cleaned for email
Divider
A thin line
Spacer
Space between blocks
Logo
Your logo from Email settings
An email can have up to 80 blocks.
Personalise it
Variable
Fills in
{{first_name}}
First name
{{last_name}}
Last name
{{name}}
Full name
{{email}}
Email
{{company}}
Company
When someone has no first name, they see "there". To change that word, open Email settings above the email and fill in When there is no first name, say.
Let Quanta help
•
Rewrite on a Text block offers Make it shorter, Make it friendlier, Make it clearer and Fix spelling and grammar.
•
Ask Quanta above the email rewrites the whole email from what you ask. Undo brings back the old version.
•
Suggest next to Subject line in Email settings offers subject lines based on the email.
Settings for this email
Select Email settings above the email to change things for this email only: the Subject line, Preview text, From name and Reply-to, the Design, the Footer and personalisation, and Tracking and delivery (Track opens, Track clicks, Add UTM tags to links and Skip people emailed in the last 3 days).
To reuse the email later, select Save as template at the bottom. Your whole team sees it when they start a new email. The blocks and the look are saved, not the audience.
Preview it and send a test
1.
Select Preview at the bottom. If you have changes that aren't saved, it says Save and preview.
2.
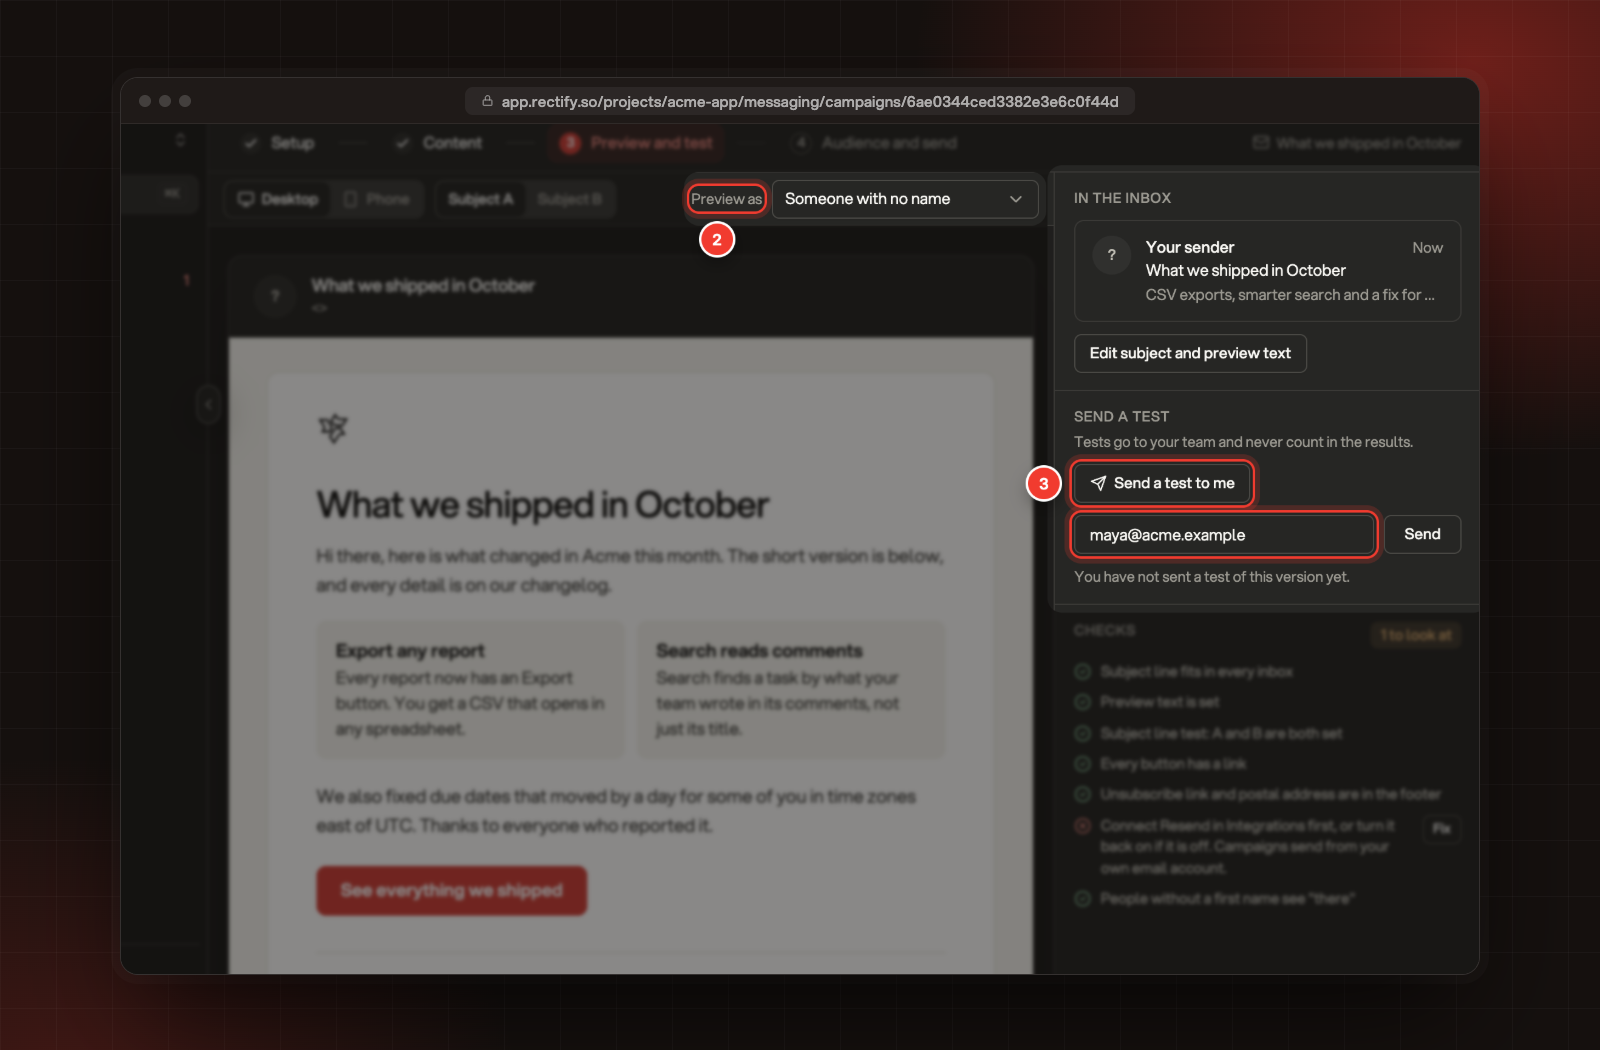
To see the email with someone's details filled in, pick them under Preview as.
3.
Select Send a test to me, or enter a teammate's address and select Send.
2 Preview as. 3 Send a test to me, or a teammate's address.
4.
Look through Checks. Select Fix next to anything marked, and Rectify takes you to it.
Tests can only go to people in your organization, and they never count in the results. The subject starts with "[Test]". When a subject line test is on, you get one test for each subject.
When the email is ready, select Choose audience. Send a campaign covers the rest.
Set the look for every email
Owners and Admins can set the starting look for every campaign. Open Messaging, then the Email settings tab.
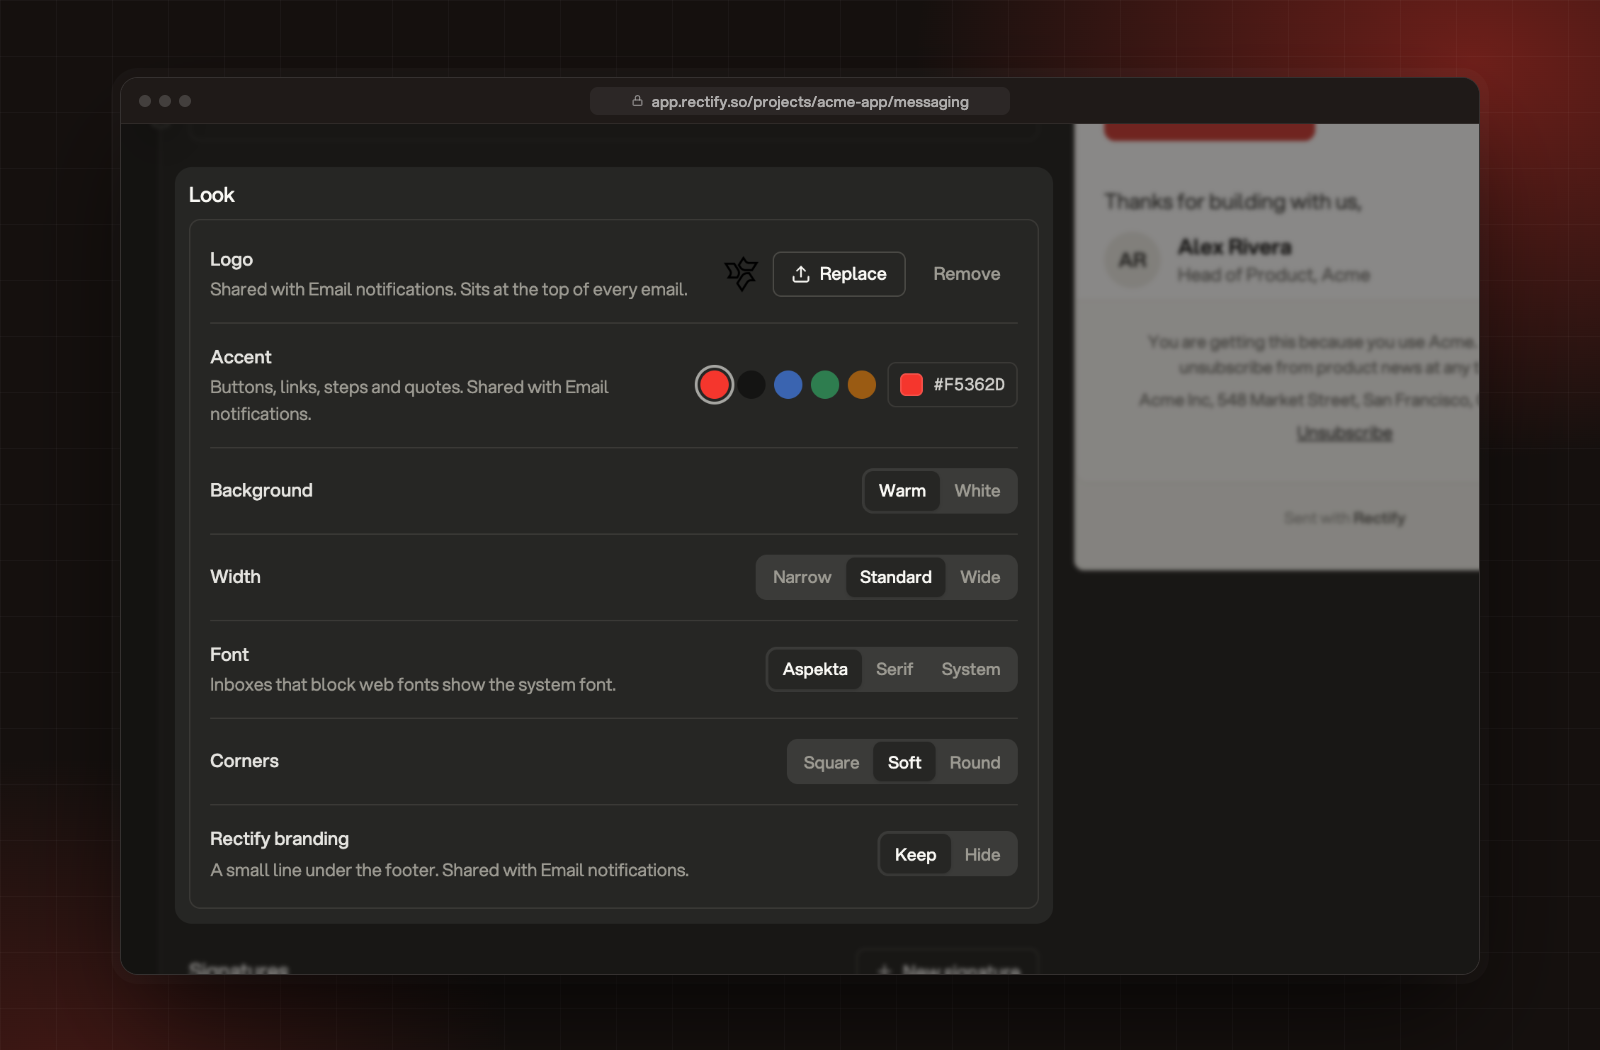
The Look settings on the Email settings tab.
Section
What you set
Look
Logo, Accent, Background, Width, Font, Corners, and whether to keep the Rectify branding line. The logo and accent are shared with Email notifications.
Signatures
Names, roles and photos to sign emails with. One is the Default.
Footer
Postal address, Footer text, a "View in browser" link and the word used when there is no first name. The unsubscribe link is always added.
Saved templates
Rename or delete the templates your team saved.
Select Save in the bar at the bottom. Hiding the Rectify branding needs the Launch plan or higher.
Troubleshooting
Selecting Email opens "Connect an email provider"
No email provider is connected to this project. An Owner or Admin can select Connect Resend. Send from your own domain walks through it.
Checks says "Add your postal address, email laws require it in every marketing email"
Open Email settings above the email and fill in Postal address, or set it once for every email on the Email settings tab.
Checks says "Unknown variable"
A variable is misspelled. Use one from the Variable menu, written exactly as it shows, for example {{first_name}}.
It says "Test emails can only go to people on your team"
Tests go only to people in your organization. Send it to your own address or a teammate's.